ScheduLearn User Manual
A complete guide to using ScheduLearn effectively.
🌟 Introduction
Welcome to the ScheduLearn user manual. This guide will walk you through the use of ScheduLearn starting from the very beginning creating an account to the more advanced features that only specific schools need. We will go over the main features of ScheduLearn that most schools will use. We will link to more advanced tutorials for features that are not commonly used in the corresponding sections. We will also cover best practices and common pitfalls to avoid. We recommend following tutorials in order, but you can also jump to the section you need using the table of contents.
Example Middle School Account
In this guide, we’ll build an example middle school schedule step by step throughout the tutorials. Don’t worry if your own school looks different, the concepts still apply, and you can adapt them to fit your needs. If something isn’t relevant, feel free to skip it. Some of the subjects in our example may not make perfect sense, but they’re included purely for demonstration, so we can show you how to use the different features of ScheduLearn.
The example school is structured as follows:
- Classes: 6A, 6B, 7, 8. In this tutorial, we’ll only demonstrate multi-grade classes using 6A and 6B for simplicity. The same principles apply if you want to add a third 6th-grade class or more, and you can extend them to any other grade (such as 7th or 8th).
- Teachers: 10
- Subjects: We will create them as we go.
- Schedule Structure: We will show for the tutorial how to set up a basic schedule structure. For more complex structures, see the Advanced Structures Tutorial. In this example, we will use a simple structure with
📅 Schedule Structure
We highly recommend giving this section special attention and time to think through your school's needs because this will affect how you set up everything else in ScheduLearn, so it’s worth getting it right from the start. Modifications to the schedule structure after you've built your schedule can be difficult.
Thinking through your school's Schedule Structure
ScheduLearn works based on blocks of time, ie. periods. For most schools that have a standard block or period schedule the schedule structure should be straight forward.
If your school has a different schedule structure for different divisions (ie. Middle School/High School or Boy Division/Girls Division) you will need to create a schedule structure for each division.
If you are unsure whether you need more than one schedule structure be sure to reach out. Getting the schedule structure set up properly will make the rest of the schedule building much easier.
Building Your Schedule Structure:
To build your schedule structure, you can 1. Use the Schedule Structure form (using the builder seen in the picture above) 2. Build Manually (start with an empty slate and make changes as seen in this section)
If you require more than one schedule structure, see our section on Multiple Schedule Structures
Using the Schedule Structure Builder
This is a one time step to help you save some time creating your schedule structure.
 Fill out the following fields and then click "Generate".
- Number of periods: The number of time blocks in the day. This should include all academic periods as well as non academic blocks such as lunch, recess, dismissal, etc.
- Length of period: The typical length of your academic period. This is just used as a default value for each period that can be overridden as necessary.
- Gap between periods: The typical time between periods. If you have a 5-minute break between each period, for instance, the period start and end times will adjust to reflect the 5 minute break. Leave it as 0 to have no gaps between the periods.
- Start time: The start time of your first period. The rest of the period times are calculated based on the length of the period and the gap between them.
All period names and times can be adjusted after you've generated the schedule structure. Don't worry if it doesn't look exactly right at this stage.
Once you've generated the schedule structure you can then make a number of modifications.
Modifying Your Schedule Structure
 - Modify period names or times - Hover your mouse over the period you want to modify. You'll see a pencil icon appear. When you click on it a modal will appear as shown below. (see the yellow arrow in the picture above).
  .
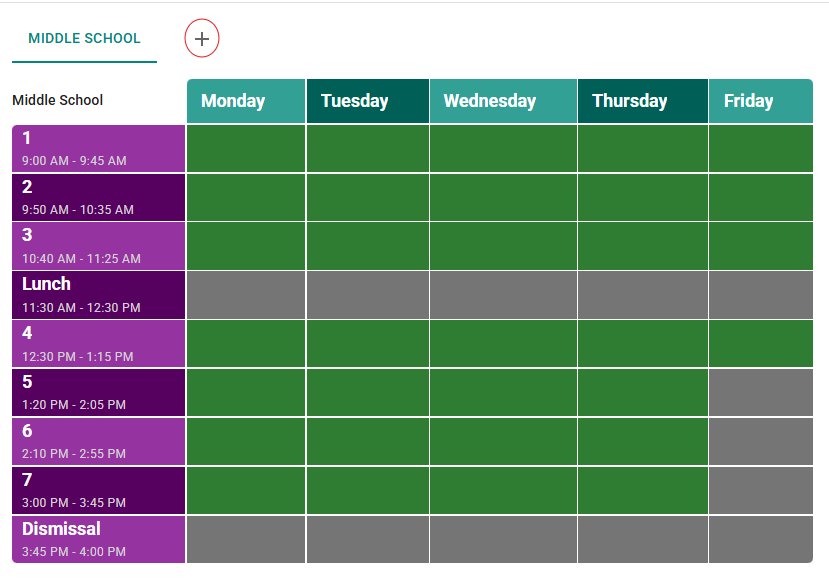
- Toggling cells on/off
By default every cell is green. Click on a cell to make it grey (blue arrow in Figure X) indicating nothing should be scheduled during that time. For instance, if Friday ends earlier (as in figure X) you would click on each cell at the end of Friday.
You can also toggle cells that are 'non academic' periods such as lunch or dismissal in Figure X.
.
- Toggling cells on/off
By default every cell is green. Click on a cell to make it grey (blue arrow in Figure X) indicating nothing should be scheduled during that time. For instance, if Friday ends earlier (as in figure X) you would click on each cell at the end of Friday.
You can also toggle cells that are 'non academic' periods such as lunch or dismissal in Figure X.
We recommend toggling all non academic periods (lunch, recess, etc.) off to get started. You can always come back and toggle a period again. - Modifying Days To modify a day's name hover over the name of the day and you'll see a pencil icon appear. Click on it and a modal will show up allowing you to modify the day's name. When to modify days 1) Your weekly cycle is different (ie. school starts on Sunday) 2) You have an A/B schedule. For each type of day, you can rename it accordingly. You will also need to delete the days you don't need. 3) A non weekly cycle. If you have a different number of days in your school cycle (such as a biweekly or 3 day cycle) you will need to add or remove days until you have the correct number associated with your cycle. You'll then went to rename each day accordingly. - Adding or removing days/periods To add a day or a period click the plus button that is next to the last day or period (red arrows in Figure x) You can only remove the last day or period in your schedule structure. The reason for this is because constraints will be linked to specific days and periods. If there are constraints associated with the day or period, removing it will also delete those constraints.
Multiple Schedule Structures:
Start with building just one of your schedule structures. Follow the instructions on building a schedule structure. Then repeat the process by adding a new schedule structure by clicking the plus button (circled in red in the Figure X).
If you don't see the plus button, it means that the Multiple Schedule Structure feature has not been enabled for your account. It is off by default as most schools don't require it. Please email us to have this feature enabled. You can go on and add the next schedule structure later.
🚀 Best Practices
- Start with just one grade.
- Create all the subjects and teachers for that grade without constraints first.
- Run validation and try generating.
- Then go back, add constraints, and generate again.
- Repeat by adding new classes.
⚠️ Warning: If you add everything at once, it’s hard to troubleshoot. Work incrementally.
📖 Terminology
Throughout the tutorials, we’ll use these terms:
- Toolbar → Quick actions at the top.
- Account Menu → Profile & logout.
- Navigation Sidebar → Main way to switch sections.
✅ Make sure the sidebar is open while working.
🏫 Classes
- Classes = groups of students that take most courses together.
- Start by creating a single class.
If you have homerooms, divisions, or tracks, you can add divisions later.
Terminology:
- Classes
- Subjects
- Lessons
👩🏫 Teachers
- Create teacher cards.
- Add a basic calendar and simple teacher constraints.
- Don’t go into advanced constraints yet.
📚 Subjects
When creating a subject, answer these:
- What does it mean if multiple classes are selected? (subject shared).
- What if multiple teachers are selected? (team teaching).
- How many subjects to create? (each teacher × subject combo = its own subject).
Lessons
- A lesson = one scheduled unit of a subject.
- A double period = two lessons placed consecutively.
Subject Fields
- Name / Short name
- Teacher(s) / Class(es)
- Lesson spread
- Lesson same time
- Calendar constraints
➗ Divisions
- A division = 2+ tracks of subjects.
- A track = list of subjects a group takes together.
Common Issues
- Unequal number of lessons per track.
- Same teacher in both tracks (not always a problem).
- Blank divisions.
- Lessons not pairing correctly.
🗂️ Item Page Features
- Info modal
- Filter
- Multi-select
- Grid/List view
⚖️ Constraints
- Use the Constraints Dashboard.
- Yellow = soft constraint.
- Red = hard constraint.
Unmet constraints appear here. You can also add global constraints here (e.g., workload).
📊 Schedule Page
Views
- By class / teacher / classroom / day
- Row/column views (global)
- Custom views
- Color by options
- Small view
Drag & Drop
- Lessons start in the staging area.
- Drag into place.
- Lessons that don’t fit cannot be moved.
- Double bookings highlight in red.
- Unmet constraints show on the lesson card.
Validation
Show 3 examples:
- Obvious conflict.
- Too many lessons for teacher/group.
- Validation passed.
Generating a Schedule
- Click Generate → wait → click View Schedule.
Schedule Settings
- Place as many as possible
- Similar schedule → use only after confirming a working version.
- Constraint weights → see advanced tutorial.
- Schedule only selected → useful for testing.
📤 Export Page
- Export to PDF or Excel.
- Export by individual teachers/classes.
Options
- Lesson coloring
- Orientation (portrait/landscape)
- Page margin
- School logo / colors
🕓 Version History
- Every time you export or generate, a new version is saved.
- You can:
- Rename versions.
- Revert to an older version.
- Search by tags (auto-added when exporting).